DIY Miniature - Spinal Ooze
A friend of mine (the same one who did this wonderful custom terrain video) recently entered a scratch-build mini contest on http://dmscraft.proboards.com and won. Since dmscraft requires registration, he's allowed me to repost his winning entry here...
======
I entered a contest for building a miniature from scratch, and actually won, haha! Contestants had one month to build the mini, and the rules stipulated that entries must include a tutorial. Since this was the first mini contest, there was no specific theme.
Here's my entry:
 I loved how they had a skull, spine and debris stuck in them and could bite. In my version, they collect a couple of spines and connect them together to extend their reach, like a support structure. This explains why the skull is so far from the ribcage in the photos below. Ok, let's get to it...

See the spikey bits? That's what we need. We cut one row out:

We take that row of spikes and hold it over a flame for a second to soften it, then bend into desired shape:

We paint that off-white/bone. We grab a skull from our box of Wargames Factory Skeletal Warriors.
I forgot to take a photo, but as you can see below, there's a bit of spine on the back of the skull. I cut that out with a razor so our new spine can mate better with the back of the skull, behind the jawbone.

Next, we alter a torso. In the photo below, you can see I removed the lower spine, then cut a channel between the shoulder blades to house our new hair-curler spine. The torso on the right is unaltered, for comparison.

Glue it on, paint it up:

Starting to look pretty creepy :)

Glue the mini on the base:

I had some dollar store beads that came with these stupid key charms I thought I'd never use:

Got to looking at them and realized they actually magnify things! They're tiny lenses, which is more evident when you cut them apart:

I had planned on putting the small ones in as slime bubbles, but then thought it'd be cool if you could see the spine inside the slime, like looking in a porthole. I hot glued 2 of the big ones as large bubbles, one on each side, but not lined up with each other.
I then added the small lenses and pre-made globs of hot glue to build up the body of the slime. Also stuck 2 shards of toothpick into his back.

Ran hot glue up his neck on both sides. Here you can see the magnification effect in the large bubble. (sort of... sorry, phone pic)

Front view so far:

Next, I prepainted a mini sword and stuck it in his back:

Painted the black slime. I slowly built up layer after layer of black wash around the bones and bubbles. I wanted the bubbles to fade from clear in the center to black at the edges.

Here you can see the tail end of his spine showing through one of the big bubbles:

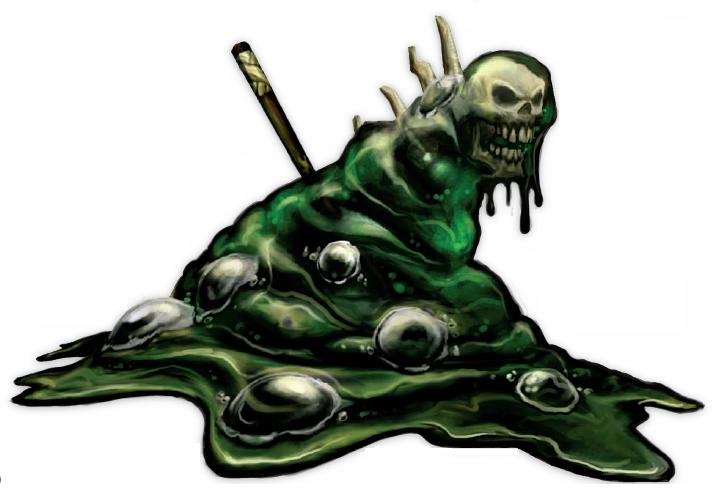
These final shots are after applying a high-gloss clear varnish to the slime. Also put a little on the base around him, to create a "snail trail". I also switched to my real camera, lol.


======
I entered a contest for building a miniature from scratch, and actually won, haha! Contestants had one month to build the mini, and the rules stipulated that entries must include a tutorial. Since this was the first mini contest, there was no specific theme.
Here's my entry:
SPINAL OOZE
This guy is based off one of my favorite World of Warcraft monsters, Blizzard's version of the Black Ooze:
Started with the inner portion of a dollar store hair curler:
See the spikey bits? That's what we need. We cut one row out:
We take that row of spikes and hold it over a flame for a second to soften it, then bend into desired shape:
We paint that off-white/bone. We grab a skull from our box of Wargames Factory Skeletal Warriors.
I forgot to take a photo, but as you can see below, there's a bit of spine on the back of the skull. I cut that out with a razor so our new spine can mate better with the back of the skull, behind the jawbone.
Next, we alter a torso. In the photo below, you can see I removed the lower spine, then cut a channel between the shoulder blades to house our new hair-curler spine. The torso on the right is unaltered, for comparison.
Glue it on, paint it up:
Starting to look pretty creepy :)
Glue the mini on the base:
I had some dollar store beads that came with these stupid key charms I thought I'd never use:
Got to looking at them and realized they actually magnify things! They're tiny lenses, which is more evident when you cut them apart:
I had planned on putting the small ones in as slime bubbles, but then thought it'd be cool if you could see the spine inside the slime, like looking in a porthole. I hot glued 2 of the big ones as large bubbles, one on each side, but not lined up with each other.
I then added the small lenses and pre-made globs of hot glue to build up the body of the slime. Also stuck 2 shards of toothpick into his back.
Ran hot glue up his neck on both sides. Here you can see the magnification effect in the large bubble. (sort of... sorry, phone pic)
Front view so far:
Next, I prepainted a mini sword and stuck it in his back:
Painted the black slime. I slowly built up layer after layer of black wash around the bones and bubbles. I wanted the bubbles to fade from clear in the center to black at the edges.
Here you can see the tail end of his spine showing through one of the big bubbles:
These final shots are after applying a high-gloss clear varnish to the slime. Also put a little on the base around him, to create a "snail trail". I also switched to my real camera, lol.
Cheers! :)

